Select2 Tutorial
Note
For demo links to work, you need to run the test project on localhost.
Overview
Autocompletes are based on 3 moving parts:
widget compatible with the model field, does the initial rendering,
javascript widget initialization code, to trigger the autocomplete,
and a view used by the widget script to get results from.
Create an autocomplete view
Example source code: test_project/select2_foreign_key
The only purpose of the autocomplete view is to serve relevant suggestions for the widget to propose to the user. DAL leverages Django’s class based views and Mixins for code reuse.
Note
Do not miss the Classy Class-Based Views website which helps a lot to work with class-based views in general.
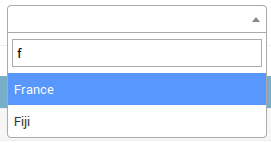
In this tutorial, we’ll first learn to make autocompletes backed by a QuerySet. Suppose we have a Country Model which we want to provide a Select2 autocomplete widget for in a form. If a user types an “f” it would propose “Fiji”, “Finland” and “France”, to authenticated users only:
The base view for this is Select2QuerySetView.
from dal import autocomplete

from your_countries_app.models import Country


class CountryAutocomplete(autocomplete.Select2QuerySetView):
    def get_queryset(self):
        # Don't forget to filter out results depending on the visitor !
        if not self.request.user.is_authenticated:
            return Country.objects.none()

        qs = Country.objects.all()

        if self.q:
            qs = qs.filter(name__istartswith=self.q)

        return qs
Note
For more complex filtering, refer to the official Django
QuerySet API documentation.
Register the autocomplete view
Create a named url for the view, ie:
from django.urls import path

from your_countries_app.views import CountryAutocomplete

urlpatterns = [
    path(
        'country-autocomplete/',
        CountryAutocomplete.as_view(),
        name='country-autocomplete',
    ),
]
Ensure that the url can be reversed, ie:
./manage.py shell
In [1]: from django.urls import reverse
In [2]: reverse('country-autocomplete')
Out[2]: '/country-autocomplete/'
Danger
As you might have noticed, we have just exposed data through a public URL. Please don’t forget to do proper permission checks in get_queryset.
Use the view in a Form widget
Before you begin
You should be able to open the view at this point:

We can now use the autocomplete view our Person form, for its birth_country
field that’s a ForeignKey. So, we’re going to override the default ModelForm fields,
to use a widget to select a Model with Select2, in our case by passing the name of the
url we have just registered to ModelSelect2.
Set form widgets
Setup your autocomplete form widget for this view in the Form.Meta.widgets
dict:
from dal import autocomplete

from django import forms


class PersonForm(forms.ModelForm):
    class Meta:
        model = Person
        fields = ('__all__')
        widgets = {
            'birth_country': autocomplete.ModelSelect2(url='country-autocomplete')
        }
If we need the country autocomplete view for a widget used for a ManyToMany relation instead of a ForeignKey, with a model like that:
class Person(models.Model):
    visited_countries = models.ManyToManyField('your_countries_app.country')
Then we would use the ModelSelect2Multiple
widget, ie.:
widgets = {
    'visited_countries': autocomplete.ModelSelect2Multiple(url='country-autocomplete')
}
Initial values on edit forms
Because Select2 widgets load their options via AJAX, the currently selected value is often absent from the choices list at render time. Without special handling, editing an existing object would show a blank autocomplete field even though a value is already saved.
All DAL Select2 widgets (ModelSelect2,
ModelSelect2Multiple,
ListSelect2,
Select2Multiple) automatically inject the
initial value into the choices at render time so it appears pre-selected. No
extra configuration is required.
Danger
If you declare a form field instead of just the widget, Django admin won’t add the “add” and “edit” button next to the autocomplete field for single model choice. If you want to both declare your field and have Django admin’s add / remove buttons then you can use the following method with djhacker.
Automation with djhacker
Example source code: test_project/select2_djhacker_formfield
import djhacker  # don't forget to pip install djhacker
from django import forms
djhacker.formfield(
    Person.birth_country,
    forms.ModelChoiceField,
    widget=autocomplete.ModelSelect2(url='country-autocomplete')
)
The above example demonstrates how to integrate your autocomplete view and form field automatically throughout Django without having to define custom model forms all the time.
Passing options to select2
Select2 supports a bunch of options. These options may be set in data-* attributes. For example:
# Instanciate a widget with a bunch of options for select2:
autocomplete.ModelSelect2(
    url='select2_fk',
    attrs={
        # Set some placeholder
        'data-placeholder': 'Autocomplete ...',
        # Only trigger autocompletion after 3 characters have been typed
        'data-minimum-input-length': 3,
    },
)
Note
Setting a placeholder will result in generation of an an empty
option tag, which select2 requires.
Using autocompletes in the admin
Note
If using djhacker, you can skip this section: your autocomplete should already be working in the admin.
We can make ModelAdmin to use our custom form, ie:
from django.contrib import admin

from your_person_app.models import Person
from your_person_app.forms import PersonForm


class PersonAdmin(admin.ModelAdmin):
    form = PersonForm
admin.site.register(Person, PersonAdmin)
Note that this also works with inlines, ie:
class PersonInline(admin.TabularInline):
    model = Person
    form = PersonForm
Using autocompletes outside the admin
Example source code: test_project/select2_outside_admin,
Live demo: /select2_outside_admin/.
Ensure that jquery is loaded before {{ form.media }}:
{% extends 'base.html' %}
{# Don't forget that one ! #}
{% load static %}

{% block content %}
<div>
    <form action="" method="post">
        {% csrf_token %}
        {{ form.as_p }}

        <div style="display: none" class="formset-empty">
            {{ view.formset.empty_form }}
        </div>

        <div class="formset-rows">
            {{ view.formset }}
        </div>

        <span id="add-form" class="button">Add form</span>

        <input type="submit" />
    </form>
</div>
{% endblock %}

{% block footer %}
<script type="text/javascript" src="{% static 'admin/js/vendor/jquery/jquery.js' %}"></script>

{{ form.media }}

<script>
(function($) {
    $('#add-form').click(function() {
        var index = $('#id_inline_test_models-TOTAL_FORMS').val()
        var newForm = $('#id_inline_test_models-__prefix__-DELETE').closest('.formset-empty').clone()
        newForm.find(':input').each(function() {
            for (attr of ['name', 'id'])
                $(this).attr(
                    attr,
                    $(this).attr(attr).replace('__prefix__', index)
                )
        })
        newForm.removeAttr('style').removeClass('formset-empty')
        newForm.insertBefore($(this))
        $('#id_inline_test_models-TOTAL_FORMS').val(
            parseInt($('#id_inline_test_models-TOTAL_FORMS').val()) + 1
        )
        newForm.slideDown()
    })
})($)
</script>
{% endblock %}
Displaying results using custom HTML
You can display custom HTML code for results by setting the data-html
attribute on your widget and overriding the view get_result_label() method
to return HTML code.
from django.utils.html import format_html

class CountryAutocomplete(autocomplete.Select2QuerySetView):
    def get_result_label(self, result):
        return format_html('<img src="flags/{}.png"> {}', result.name, result.name)


class PersonForm(forms.ModelForm):
    class Meta:
        widgets = {
            'birth_country': autocomplete.ModelSelect2(
                url='country-autocomplete',
                attrs={'data-html': True}
            )
        }
Note
Take care to escape anything you put in HTML code to avoid XSS attacks when displaying data that may have been input by a user! format_html helps.
Displaying selected result differently than in list
You can display selected result in different way than results in list by overriding
the view get_selected_result_label() method.
class CountryAutocomplete(autocomplete.Select2QuerySetView):
    def get_result_label(self, item):
        return item.full_name

    def get_selected_result_label(self, item):
        return item.short_name
Setting the data-html attribute affects both selected result and results in list.
If you want to enable HTML separately set data-selected-html or data-result-html
attribute respectively.
Overriding javascript code
We need javascript initialization for the widget both when:
The page is loaded.
A widget is dynamically added, i.e. with formsets.
This is handled by autocomplete_light.js, which is going to trigger an event
called dal-init-function on the document when Django Autocomplete Light has
initialized. At this point you can simply call yl.registerFunction() to register
your custom function.
yl.registerFunction() takes two arguments name and func. The first argument
name is the name of name the function. It should be the same as the value of your widget
autocomplete_function property which in turn is the value of the
data-autocomplete-light-function HTML attribute on your input or select field.
The second argument func is the callback function to be run by Django Autocomplete
Light when it initializes your input autocomplete.
autocomplete_light.js also keeps track of initialized elements to prevent
double-initialization.
Take dal_select2 for example, it is initialized by
dal_select2/static/autocomplete_light/select2.js as such:
document.addEventListener('dal-init-function', function () {
    yl.registerFunction( 'select2', function ($, element) {
        // autocomplete function here
    });
})
This example defines an anonymous function as a callback that will be called when Django
Autocomplete Light initializes your autocomplete input field. It will also be called when
any new field is added, such as a inline formset. The function will be called for any
element with an attribute data-autocomplete-light-function value that is the same as
the function name.
When Django Autocomplete Light calls your function two arguments are passed in. The
first is the django.jQuery object. This is done since your function may not have
access to django.jQuery in the lexical environment when the function was placed into
memory. This of course causes your function to not have access to jQuery, which may be
a problem.
The second argument is the input field DOM element. You can get the jQuery object by
simply calling var $element = $(element); inside your function.
So, you can replace the default callback by doing two things:
change the Widget’s
dal.widgets.WidgetMixin.autocomplete_functionattribute.Register your custom function with
yl.registerFunction()after thedal-init-functionevent has been called.
Example widget:
class YourWidget(ModelSelect2):
    autocomplete_function = 'your_autocomplete_function'
Example script:
document.addEventListener('dal-init-function', function () {
    yl.registerFunction( 'your_autocomplete_function', function ($, element) {
        var $element = $(element);
        // autocomplete function here
    });
})
Listening for the initialization of a specific input
To know when a specific dal input has been initialized, we can listen for the event
dal-element-initialized.
Example opening and setting focus on a dal input after initialization:
$(document).on("dal-element-initialized", function (e) {
    if (e.detail.element.id === "my_dal_element_id") {
        $("#my_dal_element_id").select2("open").trigger("focus");
    }
});
Creation of new choices in the autocomplete form
Example source code: test_project/select2_one_to_one,
Live demo: /admin/select2_one_to_one/tmodel/add/,
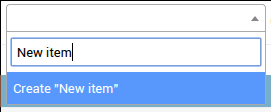
The view may provide an extra option when it can’t find any result matching the
user input. That option would have the label Create "query", where
query is the content of the input and corresponds to what the user typed
in. As such:
This allows the user to create objects on the fly from within the AJAX widget. When the user selects that option, the autocomplete script will make a POST request to the view. It should create the object and return the pk, so the item will then be added just as if it already had a PK:

To enable this, first the view must know how to create an object given only
self.q, which is the variable containing the user input in the view. Set
the create_field view option to enable creation of new objects from within
the autocomplete user interface, ie:
urlpatterns = [
    path(
        'country-autocomplete/',
        CountryAutocomplete.as_view(create_field='name', validate_create=True),
        name='country-autocomplete',
    ),
]
This way, the option ‘Create “Tibet”’ will be available if a user inputs
“Tibet” for example. When the user clicks it, it will make the post request to
the view which will do Country.objects.create(name='Tibet'). It will be
included in the server response so that the script can add it to the widget.
By activating validate_create=True, a full_clean will be run on the
create_field, thus validating all the validators on the field.
Note that creating objects is allowed to logged-in users with add permission
on the resource. If you want to grant add permission to a user, you have to
explicitly set it with something like:
permission = Permission.objects.get(name='Can add your-model-name')
user.user_permissions.add(permission)
Note that the above applies for new objects that only require one field. For more complex objects, django-addanother should be considered. With Django Add-Another, a “+” icon is rendered next to the search widget. When clicking this button, an object can be added inside a popup. Once saved, the popup will close and the newly added object will be selected in the widget.
Filtering results based on the value of other fields in the form
Example source code: test_project/linked_data.
Live demo: Admin / Linked Data / Add.
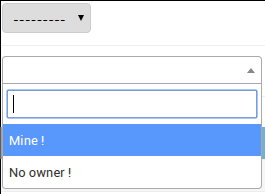
In the live demo, create a TestModel with owner=None, and another with
owner=test (test being the user you log in with). Then, in a new form,
you’ll see both options if you leave the owner select empty:
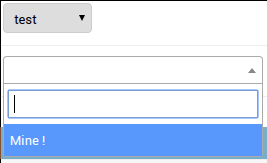
But if you select test as an owner, and open the autocomplete again, you’ll
only see the option with owner=test:
Let’s say we want to add a “Continent” choice field in the form, and filter the
countries based on the value on this field. We then need the widget to pass the
value of the continent field to the view when it fetches data. We can use the
forward widget argument to do this:
class PersonForm(forms.ModelForm):
    continent = forms.ChoiceField(choices=CONTINENT_CHOICES)

    class Meta:
        model = Person
        fields = ('__all__')
        widgets = {
            'birth_country': autocomplete.ModelSelect2(url='country-autocomplete',
                                                       forward=['continent'])
        }
DAL’s Select2 configuration script will get the value of the form field named
'continent' and add it to the autocomplete HTTP query. This will pass the
value for the “continent” form field in the AJAX request, and we can then
filter as such in the view:
class CountryAutocomplete(autocomplete.Select2QuerySetView):
    def get_queryset(self):
        if not self.request.user.is_authenticated:
            return Country.objects.none()

        qs = Country.objects.all()

        continent = self.forwarded.get('continent', None)

        if continent:
            qs = qs.filter(continent=continent)

        if self.q:
            qs = qs.filter(name__istartswith=self.q)

        return qs
Types of forwarded values
There are three possible types of value which you can get from
self.forwarded field: boolean, string or list of strings. DAL forward JS
applies the following rules when figuring out which type to use when you forward
particular field:
if there is only one field in the form or subform with given name and this field is a checkbox without
valueHTML-attribute, then a boolean value indicating if this checkbox is checked is forwarded;if there is only one field in the form or subform with given name and it has
multipleHTML-attribute, then this field is forwarded as a list of strings, containing values from this field.if there are one or more fields in the form with given name and all of them are checkboxes with HTML-attribute
valueset, then the list of strings containing checked checkboxes is forwarded.Otherwise field value forwarded as a string.
Renaming forwarded values
Example source code: test_project/rename_forward.
Live demo: Admin / Rename Forward/ Add.
Let’s assume that you have the following form using linked autocomplete fields:
class ShippingForm(forms.Form):
    src_continent = forms.ModelChoiceField(
        queryset=Continent.objects.all(),
        widget=autocomplete.ModelSelect2(url='continent-autocomplete'))
    src_country = forms.ModelChoiceField(
        queryset=Country.objects.all(),
        widget=autocomplete.ModelSelect2(
            url='country-autocomplete',
            forward=('src_continent',)))
And the following autocomplete view for country:
class CountryAutocomplete(autocomplete.Select2QuerySetView):
    def get_queryset(self):
        if not self.request.is_authenticated:
            return Country.objects.none()

        qs = Country.objects.all()

        continent = self.forwarded.get('continent', None)

        if continent:
            qs = qs.filter(continent=continent)

        if self.q:
            qs = qs.filter(name__istartswith=self.q)

        return qs
You cannot use this autocomplete view together with your form because the name forwarded from the form differs from the name that autocomplete view expects.
You can rename forwarded fields using class-based forward declaration to pass src_continent value as continent:
from dal import forward

class ShippingForm(forms.Form):
    src_continent = forms.ModelChoiceField(
        queryset=Continent.objects.all(),
        widget=autocomplete.ModelSelect2(url='continent-autocomplete'))
    src_country = forms.ModelChoiceField(
        queryset=Country.objects.all(),
        widget=autocomplete.ModelSelect2(
            url='country-autocomplete',
            forward=(forward.Field('src_continent', 'continent'),)))
Of course, you can mix up string-based and class-based forwarding declarations:
some_field = forms.ModelChoiceField(
        queryset=SomeModel.objects.all(),
        widget=autocomplete.ModelSelect2(
            url='some-autocomplete',
            forward=(
                'f1',  # String based declaration
                 forward.Field('f2'),  # Works the same way as above declaration
                 forward.Field('f3', 'field3'),  # With rename
                 forward.Const(42, 'f4')  # Constant forwarding (see below)
                 )
Forwarding arbitrary constant values
The other thing you can do with class-based forwarding declaration is to forward an arbitrary constant without adding extra hidden fields to your form.
from dal import forward

class EuropeanShippingForm(forms.Form):
    src_country = forms.ModelChoiceField(
        queryset=Country.objects.all(),
        widget=autocomplete.ModelSelect2(
            url='country-autocomplete',
            forward=(forward.Const('europe', 'continent'),)))
For src_country field “europe” will always be forwarded as continent value.
Forwarding own selected value
Quite often (especially in multiselect) you may want to exclude value which is already selected from autocomplete dropdown. Usually it can be done by forwarding a field by name. The forward argument expects a tuple, so don’t forget the trailing comma if the tuple only has one element.
from dal import forward

class SomeForm(forms.Form):
    countries = forms.ModelMultipleChoiceField(
        queryset=Country.objects.all(),
        widget=autocomplete.ModelSelect2Multiple(
            url='country-autocomplete',
            forward=("countries", )
For this special case DAL provides a shortcut named Self().
from dal import forward

class SomeForm(forms.Form):
    countries = forms.ModelMultipleChoiceField(
        queryset=Country.objects.all(),
        widget=autocomplete.ModelSelect2Multiple(
            url='country-autocomplete',
            forward=(forward.Self(),)
In this case the value from countries will be available from autocomplete
view as self.forwarded['self']. Of course, you can customize destination
name by passing dst parameter to Self constructor.
Customizing forwarding logic
DAL tries hard to reasonably forward any standard HTML form field. For some non-standard fields DAL logic could be not good enough. For these cases DAL provides a way to customize forwarding logic using JS callbacks. You can register JS forward handler on your page:
// autocompleteElem here is an HTML element for autocomplete field
yl.registerForwardHandler("my_awesome_handler", function (autocompleteElem) {
    return doSomeMagicAndGetValueFromSpace();
});
Then you should add forward declaration to your field as follows:
from dal import forward

class ShippingForm(forms.Form):
    country = forms.ModelChoiceField(
        queryset=Country.objects.all(),
        widget=autocomplete.ModelSelect2(
            url='country-autocomplete',
            forward=(forward.JavaScript('my_awesome_handler', 'magic_number'),)))
In this case the value returned from your registered handler will be forwarded
to autocomplete view as magic_number.
Building blocks for custom logic
Javascript logic for forwarding field values is a bit sophisticated. In order to forward field value DAL searches for the field considering form prefixes and then decides how to forward it to the server (should it be list, string or boolean value). When you implement your own logic for forwarding you may want to reuse this logic from DAL.
For this purpose DAL provides two JS functions:
getFieldRelativeTo(element, name)- get field bynamerelative to this autocomplete field just like DAL does when forwarding a field.getValueFromField(field)- get value to forward fromfieldjust like DAL does when forwarding a field.
For the purpose of understanding the logic: you can implement forwarding of some standard field by yourself as follows (you probably should never write this code yourself):
yl.registerForwardHandler("poormans_field_forward",
    function (elem) {
        return yl.getValueFromField(
            yl.getFieldRelativeTo(elem, "some_field"));
    });
Clearing autocomplete on forward field change
You can use the $.getFormPrefix() jQuery plugin used by DAL to clear the
birth_country autocomplete widget from the above example when the
continent field changes with such a snippet:
$(document).ready(function() {
    // Bind on continent field change
    $(':input[name$=continent]').on('change', function() {
        // Get the field prefix, ie. if this comes from a formset form
        var prefix = $(this).getFormPrefix();

        // Clear the autocomplete with the same prefix
        $(':input[name=' + prefix + 'birth_country]').val(null).trigger('change');
    });
});
To autoload the script with the form, you can use Form.Media.
Autocompleting based on a List of Strings
Sometimes it is useful to specify autocomplete choices based on a list
of strings rather than a QuerySet. This can be achieved with the
Select2ListView class:
class CountryAutocompleteFromList(autocomplete.Select2ListView):
    def get_list(self):
        return ['France', 'Fiji', 'Finland', 'Switzerland']
This class can then be registered as in the previous example. Suppose we register it under URL ‘country-list-autocomplete’. We can then a create a ListSelect2 widget with:
widget = autocomplete.ListSelect2(url='country-list-autocomplete')
With this in place, if a user types the letter f’ in the widget, choices
‘France’, ‘Fiji’, and ‘Finland’ would be offered. Like the Select2QuerySetView,
the Select2ListView is case insensitive.
Two fields are provided, Select2ListChoiceField,
Select2ListCreateChoiceField that can be used to
make it easier to avoid problems when using Select2ListView. For example:
def get_choice_list():
    return ['France', 'Fiji', 'Finland', 'Switzerland']


class CountryForm(forms.ModelForm):
    country = autocomplete.Select2ListChoiceField(
        choice_list=get_choice_list,
        widget=autocomplete.ListSelect2(url='country-list-autocomplete')
    )
By default, the selections in Select2ListView can map directly to a list, resulting in the same text and value for each option.
To define your own values for each selection, provide a list-of-lists or list-of-tuples for the Select2ListView choice_list. For example:
class CountryAutocompleteFromList(autocomplete.Select2ListView):
    def get_list(self):
        return [
            ['France_value', 'France'],
            ['Fiji_value', 'Fiji'],
            ['Finland_value', 'Finland'],
            ['Switzerland_value', 'Switzerland']
        ]


def get_choice_list():
    return [
        ['France_value', 'France'],
        ['Fiji_value', 'Fiji'],
        ['Finland_value', 'Finland'],
        ['Switzerland_value', 'Switzerland']
    ]


class CountryForm(forms.ModelForm):
    country = autocomplete.Select2ListChoiceField(
        choice_list=get_choice_list,
        widget=autocomplete.ListSelect2(url='country-list-autocomplete')
    )
Select2ListCreateChoiceField allows you to provide custom
text from a Select2List widget and should be used if you define
Select2ListViewAutocomplete.create.
It is better to use the same source for
Select2ListViewAutocomplete.get_list in your view and the
Select2ListChoiceField choice_list kwarg to avoid unexpected behavior.
An opt-group version is available in a similar fashion by inheriting Select2GroupListView. For example:
class CountryAutocompleteFromList(autocomplete.Select2GroupListView):
    def get_list(self):
        return [
            (None, ['Mars Colony',]),
            ("Country", ['France', 'Fiji', 'Finland', 'Switzerland'])
        ]
As with Select2ListView, for opt-groups with specified values, provide a list-of-lists or list-of-tuples to the Select2GroupListView get_list method. For example:
class CountryAutocompleteFromList(autocomplete.Select2GroupListView):
    def get_list(self):
        return [
            ([None, None], [['Mars_colony_value', 'Mars Colony']]),
            (
                ['Country_value', 'Country'],
                [
                    ['France_value', 'France'],
                    ['Fiji_value', 'Fiji'],
                    ['Finland_value', 'Finland'],
                    ['Switzerland_value', 'Switzerland']
                ]
            )
        ]